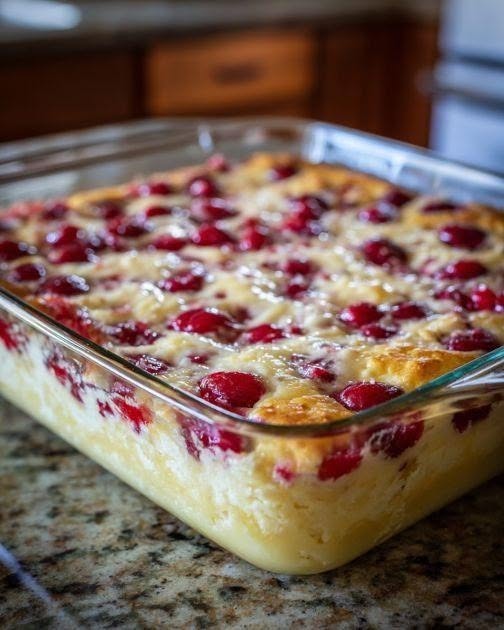
Sometimes the best desserts are the ones that don’t require a long ingredient list or hours in the kitchen. These Cherry Cheesecake Bars are the perfect example. With just three main ingredients, you can whip up a creamy, fruity dessert that looks impressive but is incredibly easy to make.
There’s something so good about the combination of a buttery cake layer, smooth cream cheese, and sweet cherry filling. Every bite has a little bit of everything, and somehow these bars always disappear faster than expected.
They’re perfect for holidays, potlucks, family dinners, summer gatherings, or simply when you’re craving something sweet without wanting to tackle a complicated recipe.
Why You’ll Love These Cherry Cheesecake Bars
These bars have everything you want in an easy dessert: minimal ingredients, simple preparation, and plenty of flavor.
Just 3 Main Ingredients
No complicated shopping list here. A box of yellow cake mix, cream cheese, and cherry pie filling come together to create a surprisingly delicious dessert.
Great for Any Occasion
These cheesecake bars are easy enough for a casual weekend but special enough for a celebration.
They’re perfect for:
- Family dinners
- Holiday gatherings
- Potlucks
- Summer cookouts
- Birthday parties
- Weekend baking
Creamy, Fruity, and Buttery
The rich cream cheese layer balances the sweetness of the cherries, while the cake mix adds a soft, buttery texture and a lightly crisp topping.
Beginner-Friendly
You don’t need fancy baking equipment or advanced skills. The preparation is straightforward, making this a great recipe for beginner bakers.
Ingredients You’ll Need
The ingredient list couldn’t be much simpler.
Yellow Cake Mix — 18.25 ounces
The yellow cake mix does double duty, forming the base and the crumble-like topping. It adds sweetness, buttery flavor, and plenty of texture without requiring you to measure several dry ingredients.
Cream Cheese — 8 ounces
Use softened cream cheese for the smoothest filling. Full-fat cream cheese gives the bars their richest flavor and creamiest texture.
Let it sit at room temperature for about 30 minutes before you begin.
Cherry Pie Filling — 21 ounces
Cherry pie filling brings the fruity sweetness and gorgeous color to these bars. The cherries also add just enough tartness to balance the creamy filling.
Easy Variations
One of the best things about this recipe is how easy it is to change the flavor.
Blueberry Cheesecake Bars
Swap the cherry filling for blueberry pie filling for a sweet, slightly tangy version that’s especially delicious during the warmer months.
Apple Cheesecake Bars
Apple pie filling gives these bars a cozy fall-inspired flavor. Add a little cinnamon on top if you want even more warmth.
Peach Cheesecake Bars
Peach pie filling creates a bright, fruity variation that tastes like summer.
Mixed Berry Cheesecake Bars
Use mixed berry pie filling for a colorful dessert with a combination of sweet and tart fruit flavors.
How to Make Cherry Cheesecake Bars
Step 1: Prepare the Pan
Preheat your oven to 350°F.
Lightly grease a 9×13-inch baking dish, or line it with parchment paper if you want easier cleanup and simpler removal.
Step 2: Make the Cake Mix Base
Set aside about 1 cup of the dry cake mix to use for the topping.
Press the remaining cake mix evenly into the bottom of the prepared baking dish. Try to create an even layer that reaches all the way to the edges.
Step 3: Add the Cream Cheese
Place the softened cream cheese in a mixing bowl and beat until smooth.
Spread the cream cheese evenly over the cake mix base. Take your time with this step so the filling reaches the corners and creates an even layer.
Step 4: Add the Cherry Filling
Spoon the cherry pie filling over the cream cheese.
Gently spread it across the surface without disturbing the cheesecake layer underneath.
Step 5: Add the Topping
Sprinkle the reserved cake mix evenly over the cherry filling.
As it bakes, the cake mix will develop a lightly golden topping that adds a lovely contrast to the creamy filling and juicy cherries.
Step 6: Bake
Place the pan in the preheated oven and bake for approximately 35–40 minutes.
The top should be lightly golden, and the filling should look mostly set.
Step 7: Cool and Chill
Remove the bars from the oven and allow them to cool completely.
For the best texture, refrigerate them for at least 2 hours before slicing. Chilling gives the cream cheese layer time to firm up and makes the bars much easier to cut cleanly.
Tips for Perfect Cherry Cheesecake Bars
Let the Cream Cheese Soften
This small step makes a big difference. Softened cream cheese spreads much more easily and helps prevent lumps.
Don’t Rush the Chilling Time
It can be tempting to cut into the bars while they’re still warm, but waiting is worth it. Chilled bars hold their shape much better.
Use a Sharp Knife
For neat slices, use a sharp knife and wipe it clean between cuts. This helps keep the cherry and cream cheese layers looking distinct.
Keep an Eye on the Oven
You don’t want to overbake these bars. The center should be set but can still look slightly soft when you remove the pan from the oven. The filling will continue to firm as the bars cool.
Why These Bars Are So Irresistible
Cherry cheesecake has a wonderfully nostalgic quality. The combination of creamy cheesecake and bright cherry topping has been a favorite at family gatherings and holiday tables for generations.
These bars give you those same classic flavors without the hassle of making a traditional cheesecake.
There’s no springform pan, water bath, or complicated cheesecake technique required. Just layer, bake, cool, and chill.
Simple desserts like this are hard to beat.
Serving Suggestions
These bars are delicious straight from the refrigerator, but you can easily dress them up for a special occasion.
Add Whipped Cream
A little whipped cream on top makes each serving extra creamy and indulgent.
Serve with Vanilla Ice Cream
For an especially decadent dessert, serve a chilled bar alongside a scoop of vanilla ice cream.
Garnish with Fresh Cherries
If fresh cherries are in season, add a few on top just before serving for a beautiful finishing touch.
Sprinkle with Powdered Sugar
A light dusting of powdered sugar gives the bars an elegant, bakery-style appearance.
How to Store Cherry Cheesecake Bars
Refrigerator
Because these bars contain cream cheese, leftovers should be refrigerated. Store them in an airtight container for up to 5 days.
Freezer
You can also freeze the bars for longer storage.
Wrap individual portions tightly or freeze the entire batch in a well-sealed container. They can be frozen for up to 3 months.
When you’re ready to enjoy them, thaw them overnight in the refrigerator.
Common Mistakes to Avoid
Using Cold Cream Cheese
Cold cream cheese can be difficult to spread and may leave lumps. Let it soften before mixing.
Cutting the Bars Too Early
Fresh-from-the-oven bars are soft and delicate. Give them plenty of time to cool, then refrigerate them before slicing.
Overbaking
Baking too long can make the cheesecake layer dry instead of creamy. Remove the bars when the top is lightly golden and the center is set but still slightly soft.
Frequently Asked Questions
Can I use another pie filling?
Absolutely. Blueberry, apple, peach, strawberry, and mixed berry fillings can all be used instead of cherry.
Do Cherry Cheesecake Bars need to be refrigerated?
Yes. Since they contain cream cheese, store them in the refrigerator.
Can I make these ahead of time?
Definitely. In fact, making them a day ahead can be even better because the cheesecake layer has plenty of time to chill and firm up.
Can I freeze Cherry Cheesecake Bars?
Yes. Wrap them tightly and freeze for up to 3 months. Thaw overnight in the refrigerator before serving.
How long will they keep?
Properly refrigerated, the bars will stay fresh for up to 5 days.
Can I use low-fat cream cheese?
Yes, although full-fat cream cheese will give you a richer flavor and smoother, creamier texture.
Why are my cheesecake bars too soft?
They may simply need more time to chill. Refrigerating them for several hours allows the cream cheese layer to firm up properly.
Final Thoughts
These Cherry Cheesecake Bars prove that you don’t need a complicated recipe to make an impressive dessert. With a buttery cake base, creamy cheesecake layer, and sweet cherry topping, they offer all the flavors of classic cherry cheesecake in an easy-to-serve bar.
Whether you’re preparing dessert for a holiday, taking something to a potluck, or just want an easy homemade treat for the weekend, this recipe is a winner.
Make them once, and there’s a good chance your family will be asking when you’re making them again!