
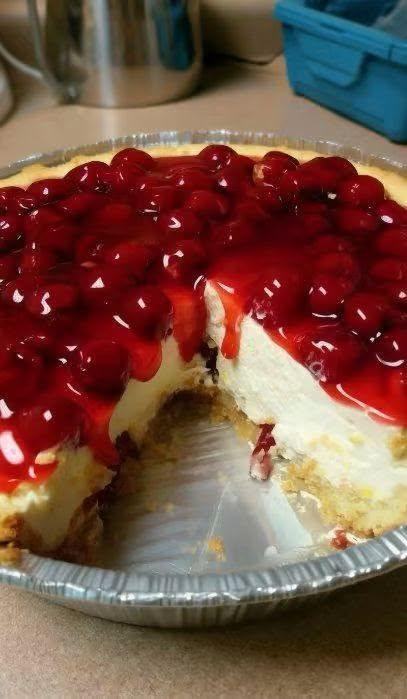
Creamy, Easy & Refreshing Cheesecake Without the Oven
This No-Bake Cheesecake with Cherry Topping is the perfect dessert when you want something creamy, fruity, and impressive without turning on the oven. It features a buttery biscuit crust, a smooth and fluffy cream cheese filling, and a sweet-tart cherry topping that comes together in just a few simple steps.
Unlike traditional baked cheesecake, this easy no-bake version requires no water bath, complicated baking techniques, or oven time. Simply prepare the crust and filling, let everything chill until firm, then finish it with homemade cherry sauce.
The result is a cool, creamy dessert with the perfect contrast of crunchy crust, silky cheesecake, and juicy cherries. It’s ideal for birthdays, holidays, dinner parties, potlucks, or an everyday sweet treat.
Why You’ll Love This No-Bake Cheesecake
- No oven required: Perfect for warm days or when you want an easy dessert.
- Simple ingredients: Everything is easy to find at most grocery stores.
- Creamy and smooth: Whipped cream gives the filling a light, airy texture.
- Fresh cherry flavor: The homemade topping adds a delicious sweet-tart contrast.
- Make-ahead friendly: Prepare it the day before and keep it refrigerated.
- Perfect for entertaining: It looks elegant with very little effort.
Ingredients
For the Biscuit Crust
- 250 g digestive biscuits or graham crackers
- 100 g unsalted butter, melted
- 1 tablespoon granulated sugar, optional
- 1 teaspoon vanilla extract, optional
Digestive biscuits create a classic buttery base, but graham crackers, shortbread cookies, or other plain biscuits can also be used.
For the Cheesecake Filling
- 500 g full-fat cream cheese, softened
- 100 g powdered sugar
- 1 teaspoon vanilla extract
- 250 ml cold heavy whipping cream
- 1 tablespoon fresh lemon juice
- 1 teaspoon lemon zest, optional
For the creamiest texture, use full-fat cream cheese and let it soften to room temperature before mixing.
For the Cherry Topping
- 400 g fresh or frozen cherries, pitted
- 80 g granulated sugar
- 1 tablespoon fresh lemon juice
- 1 teaspoon vanilla extract
- 1 tablespoon cornstarch
- 2 tablespoons cold water
Fresh cherries are wonderful during cherry season, while frozen cherries make this dessert easy to enjoy year-round.
Equipment
- 20–23 cm springform pan
- Food processor or rolling pin
- Mixing bowls
- Electric hand mixer or stand mixer
- Rubber spatula
- Small saucepan
- Measuring cups and spoons
- Refrigerator
A springform pan makes it much easier to remove the cheesecake once it has chilled. If you don’t have one, you can prepare the dessert in a deep pie dish or baking dish and serve it directly from the dish.
How to Make No-Bake Cheesecake with Cherry Topping
1. Make the Biscuit Crust
Begin by crushing the digestive biscuits into fine crumbs. A food processor works quickly, but you can also place the biscuits in a sealed bag and crush them with a rolling pin.
Transfer the crumbs to a bowl and stir in the melted butter until evenly combined. The mixture should have the texture of wet sand.
Add the optional sugar and vanilla if desired.
Line the bottom of a 20–23 cm springform pan with parchment paper. Pour the biscuit mixture into the pan and press it firmly into an even layer.
Use the bottom of a glass or measuring cup to compact the crust, making sure it is firmly packed so it holds together when sliced.
Refrigerate the crust while you prepare the filling.
2. Prepare the Cheesecake Filling
Place the softened cream cheese in a large bowl. Add the powdered sugar and vanilla extract.
Beat with an electric mixer until completely smooth and creamy, scraping down the sides of the bowl as needed.
Add the lemon juice and optional lemon zest. The lemon adds a bright, fresh flavor that balances the richness of the cream cheese.
In a separate clean bowl, beat the cold heavy cream until stiff peaks form. Avoid overwhipping, as the cream can become grainy.
Using a rubber spatula, gently fold the whipped cream into the cream cheese mixture. Fold carefully rather than stirring vigorously to maintain the light and airy texture.
3. Fill and Chill the Cheesecake
Remove the crust from the refrigerator and spoon the cheesecake filling over it.
Spread the filling into an even layer using a spatula or the back of a spoon. Smooth the top as much as possible.
Cover the pan loosely with plastic wrap or foil and refrigerate for at least 6 hours.
For the best texture and cleanest slices, chilling the cheesecake overnight is recommended.
4. Prepare the Cherry Topping
While the cheesecake chills, make the cherry topping.
Add the pitted cherries, granulated sugar, and lemon juice to a small saucepan over medium heat.
Cook for several minutes, stirring occasionally, until the cherries soften and release their juices.
In a small bowl, whisk together the cornstarch and cold water until smooth.
Pour the cornstarch slurry into the saucepan and stir continuously.
Cook for another 1–3 minutes, or until the cherry mixture thickens and becomes glossy.
Remove from the heat and stir in the vanilla extract.
Allow the topping to cool completely before adding it to the cheesecake. Hot cherry sauce can soften the cheesecake filling.
5. Add the Cherry Topping
Once the cheesecake is fully chilled and the cherry topping has cooled, carefully remove the sides of the springform pan.
Spoon the cherry topping over the cheesecake and gently spread it toward the edges.
For an elegant presentation, leave a narrow border of cheesecake visible around the outside.
You can also decorate the top with fresh cherries, whipped cream, or a few small mint leaves.
6. Slice and Serve
For neat slices, dip a sharp knife into warm water, then wipe it dry before cutting.
Repeat between slices for smooth, clean cuts.
Serve the cheesecake chilled and enjoy the creamy filling, buttery crust, and sweet-tart cherry topping.
Tips for the Best No-Bake Cheesecake
Use Full-Fat Cream Cheese
Full-fat cream cheese provides the richest flavor and firmest texture. Lower-fat varieties may contain more moisture and can produce a softer filling.
Soften the Cream Cheese First
Room-temperature cream cheese blends much more smoothly than cold cream cheese and helps prevent lumps.
Keep the Heavy Cream Cold
Use heavy cream straight from the refrigerator. Cold cream whips more easily and helps create a stable filling.
Give It Plenty of Time to Chill
Don’t rush the chilling process. The cheesecake needs enough time to firm up properly.
At least 6 hours is recommended, while overnight chilling provides an even firmer texture and cleaner slices.
Cool the Cherry Topping Completely
Make sure the cherry topping is completely cool before spreading it over the cheesecake. Adding warm sauce can soften the filling.
To cool it faster, transfer the topping to a shallow bowl and refrigerate it for a short time.
Can I Use Frozen Cherries?
Absolutely. Frozen cherries work very well in this recipe.
Because frozen cherries can release additional liquid as they cook, allow the topping to simmer until it reaches a thick, spoonable consistency. If needed, add a little more cornstarch slurry to thicken it.
There is no need to completely thaw frozen cherries before cooking.
Can I Use Other Fruit?
Yes! This cheesecake is incredibly versatile.
Try replacing the cherries with:
- Strawberries
- Blueberries
- Raspberries
- Blackberries
- Peaches
- Mixed berries
- Mango
- A combination of raspberries and strawberries
You can easily change the topping based on the season or whatever fruit you have available.
How to Store No-Bake Cheesecake
Keep the cheesecake covered and refrigerated until serving.
It can generally be stored in the refrigerator for up to 3 days. For the best texture and flavor, enjoy it within the first couple of days.
Keeping the cheesecake covered also helps prevent it from absorbing odors from other foods in the refrigerator.
Can I Make This Cheesecake Ahead of Time?
Yes! This is an excellent make-ahead dessert.
Prepare the crust and cheesecake filling the day before serving, cover the pan, and refrigerate overnight.
The cherry topping can also be prepared ahead and stored separately in the refrigerator. If it becomes very thick when chilled, let it sit at room temperature for a few minutes before spooning it over the cheesecake.
This makes the recipe especially convenient for holidays, birthdays, dinner parties, and family gatherings.
Serving Suggestions
This cheesecake is delicious on its own, but a few simple toppings can make each slice even more special.
Try serving it with:
- Whipped cream
- Fresh cherries
- A dusting of powdered sugar
- Chocolate shavings
- Melted chocolate drizzle
- Fresh mint leaves
- Vanilla ice cream
For an elegant presentation, pipe a little whipped cream around each slice and finish with a fresh cherry.
Frequently Asked Questions
Does No-Bake Cheesecake Need Gelatin?
Not necessarily. This recipe doesn’t require gelatin because the combination of cream cheese, properly whipped heavy cream, and sufficient chilling time provides structure.
If you prefer an especially firm cheesecake or live in a particularly warm climate, you may choose to use a no-bake cheesecake recipe formulated with gelatin or another setting agent.
Why Is My No-Bake Cheesecake Too Soft?
A soft cheesecake can be caused by insufficient chilling, cream that wasn’t whipped enough, or ingredients containing too much liquid.
For a firmer result, use full-fat cream cheese, cold heavy cream, and refrigerate the cheesecake for at least 6 hours, preferably overnight.
How Long Should No-Bake Cheesecake Chill?
Chill the cheesecake for a minimum of 6 hours. Overnight is even better if you want firm, clean slices.
Can I Freeze No-Bake Cheesecake?
Yes. For the best results, freeze the cheesecake without the cherry topping.
Wrap it tightly and freeze for up to about 1 month for the best quality. Thaw it slowly in the refrigerator before serving.
Add the cherry topping after thawing for the best fruit texture and appearance.
Recipe Summary
This No-Bake Cheesecake with Cherry Topping combines a buttery biscuit crust, creamy vanilla cheesecake filling, and homemade cherry topping for an easy dessert that looks as beautiful as it tastes.
With no oven required and plenty of make-ahead convenience, it’s a wonderful choice for special occasions or simple family desserts. Every bite delivers a delicious combination of creamy, crunchy, sweet, and slightly tangy flavors.
No-Bake Cheesecake with Cherry Topping Recipe Card
Prep Time: 30 minutes
Chilling Time: 6–8 hours
Total Time: About 7 hours
Servings: 10–12 slices
Difficulty: Easy
Ingredients
For the crust:
- 250 g digestive biscuits
- 100 g unsalted butter, melted
- 1 tablespoon granulated sugar, optional
For the filling:
- 500 g full-fat cream cheese, softened
- 100 g powdered sugar
- 1 teaspoon vanilla extract
- 250 ml cold heavy whipping cream
- 1 tablespoon fresh lemon juice
- 1 teaspoon lemon zest, optional
For the cherry topping:
- 400 g pitted cherries
- 80 g granulated sugar
- 1 tablespoon fresh lemon juice
- 1 teaspoon vanilla extract
- 1 tablespoon cornstarch
- 2 tablespoons cold water
Instructions
- Crush the digestive biscuits into fine crumbs.
- Combine the crumbs with melted butter and optional sugar.
- Press the mixture firmly into the bottom of a springform pan.
- Refrigerate the crust while preparing the filling.
- Beat softened cream cheese, powdered sugar, and vanilla until smooth.
- Mix in the lemon juice and optional lemon zest.
- Whip the cold heavy cream until stiff peaks form.
- Gently fold the whipped cream into the cream cheese mixture.
- Spread the filling evenly over the chilled crust.
- Cover and refrigerate for at least 6 hours, preferably overnight.
- Cook the cherries, sugar, and lemon juice in a saucepan until softened.
- Mix the cornstarch with cold water and stir it into the cherries.
- Cook until the topping thickens and becomes glossy.
- Remove from the heat, stir in vanilla, and cool completely.
- Spoon the cooled cherry topping over the chilled cheesecake.
- Slice and serve cold.
Final Thoughts
This easy No-Bake Cherry Cheesecake proves that an impressive homemade dessert doesn’t have to involve an oven or complicated techniques.
The buttery biscuit crust, smooth and creamy cheesecake filling, and juicy cherry topping create the perfect combination of textures and flavors. Best of all, you can prepare it ahead of time and let the refrigerator do most of the work.
Make it the night before your next gathering, keep it chilled, and add the cherry topping before serving for a beautiful dessert everyone will love.


